NWP_Query Object
(
[query] => Array
(
[post_type] => kb
[post__not_in] => Array
(
[0] => 36705
)
[tax_query] => Array
(
[0] => Array
(
[taxonomy] => kbtopic
[field] => slug
[terms] => wiring-diagrams
)
)
[posts_per_page] => 4
[orderby] => rand
)
[query_vars] => Array
(
[post_type] => kb
[post__not_in] => Array
(
[0] => 36705
)
[tax_query] => Array
(
[0] => Array
(
[taxonomy] => kbtopic
[field] => slug
[terms] => wiring-diagrams
)
)
[posts_per_page] => 4
[orderby] => meta_value_num menu_order
[error] =>
[m] =>
[p] => 0
[post_parent] =>
[subpost] =>
[subpost_id] =>
[attachment] =>
[attachment_id] => 0
[name] =>
[pagename] =>
[page_id] => 0
[second] =>
[minute] =>
[hour] =>
[day] => 0
[monthnum] => 0
[year] => 0
[w] => 0
[category_name] =>
[tag] =>
[cat] =>
[tag_id] =>
[author] =>
[author_name] =>
[feed] =>
[tb] =>
[paged] => 0
[meta_key] =>
[meta_value] =>
[preview] =>
[s] =>
[sentence] =>
[title] =>
[fields] =>
[menu_order] =>
[embed] =>
[category__in] => Array
(
)
[category__not_in] => Array
(
)
[category__and] => Array
(
)
[post__in] => Array
(
)
[post_name__in] => Array
(
)
[tag__in] => Array
(
)
[tag__not_in] => Array
(
)
[tag__and] => Array
(
)
[tag_slug__in] => Array
(
)
[tag_slug__and] => Array
(
)
[post_parent__in] => Array
(
)
[post_parent__not_in] => Array
(
)
[author__in] => Array
(
)
[author__not_in] => Array
(
)
[search_columns] => Array
(
)
[meta_query] => Array
(
[relation] => OR
[0] => Array
(
[key] => mkb_tax_order_5723
[compare] => EXISTS
)
[1] => Array
(
[key] => mkb_tax_order_5723
[compare] => NOT EXISTS
)
)
[order] => ASC
[ignore_sticky_posts] =>
[suppress_filters] =>
[cache_results] => 1
[update_post_term_cache] => 1
[update_menu_item_cache] =>
[lazy_load_term_meta] => 1
[update_post_meta_cache] => 1
[nopaging] =>
[comments_per_page] => 50
[no_found_rows] =>
[taxonomy] => kbtopic
[term] => wiring-diagrams
)
[tax_query] => WP_Tax_Query Object
(
[queries] => Array
(
[0] => Array
(
[taxonomy] => kbtopic
[terms] => Array
(
[0] => wiring-diagrams
)
[field] => slug
[operator] => IN
[include_children] => 1
)
)
[relation] => AND
[table_aliases:protected] => Array
(
[0] => wp_term_relationships
)
[queried_terms] => Array
(
[kbtopic] => Array
(
[terms] => Array
(
[0] => wiring-diagrams
)
[field] => slug
)
)
[primary_table] => wp_posts
[primary_id_column] => ID
)
[meta_query] => WP_Meta_Query Object
(
[queries] => Array
(
[0] => Array
(
[key] => mkb_tax_order_5723
[compare] => EXISTS
)
[1] => Array
(
[key] => mkb_tax_order_5723
[compare] => NOT EXISTS
)
[relation] => OR
)
[relation] => OR
[meta_table] => wp_postmeta
[meta_id_column] => post_id
[primary_table] => wp_posts
[primary_id_column] => ID
[table_aliases:protected] => Array
(
[0] => wp_postmeta
[1] => mt1
)
[clauses:protected] => Array
(
[wp_postmeta] => Array
(
[key] => mkb_tax_order_5723
[compare] => EXISTS
[compare_key] => =
[alias] => wp_postmeta
[cast] => CHAR
)
[mt1] => Array
(
[key] => mkb_tax_order_5723
[compare] => NOT EXISTS
[compare_key] => =
[alias] => mt1
[cast] => CHAR
)
)
[has_or_relation:protected] => 1
)
[date_query] =>
[queried_object] => WP_Term Object
(
[term_id] => 5723
[name] => Wiring Diagrams
[slug] => wiring-diagrams
[term_group] => 0
[term_taxonomy_id] => 5723
[taxonomy] => kbtopic
[description] =>
[parent] => 5719
[count] => 3
[filter] => raw
[term_order] => 4
)
[queried_object_id] => 5723
[request] => SELECT SQL_CALC_FOUND_ROWS wp_posts.ID
FROM wp_posts LEFT JOIN wp_term_relationships ON (wp_posts.ID = wp_term_relationships.object_id) LEFT JOIN wp_postmeta ON ( wp_posts.ID = wp_postmeta.post_id ) LEFT JOIN wp_postmeta AS mt1 ON ( wp_posts.ID = mt1.post_id AND mt1.meta_key = 'mkb_tax_order_5723' )
WHERE 1=1 AND wp_posts.ID NOT IN (36705) AND (
wp_term_relationships.term_taxonomy_id IN (5723)
) AND (
wp_postmeta.meta_key = 'mkb_tax_order_5723'
OR
mt1.post_id IS NULL
) AND ((wp_posts.post_type = 'kb' AND (wp_posts.post_status = 'publish' OR wp_posts.post_status = 'acf-disabled')))
GROUP BY wp_posts.ID
ORDER BY wp_postmeta.meta_value+0 ASC, wp_posts.menu_order ASC
LIMIT 0, 4
[posts] => Array
(
[0] => WP_Post Object
(
[ID] => 37131
[post_author] => 18
[post_date] => 2021-08-15 19:50:20
[post_date_gmt] => 2021-08-16 02:50:20
[post_content] =>
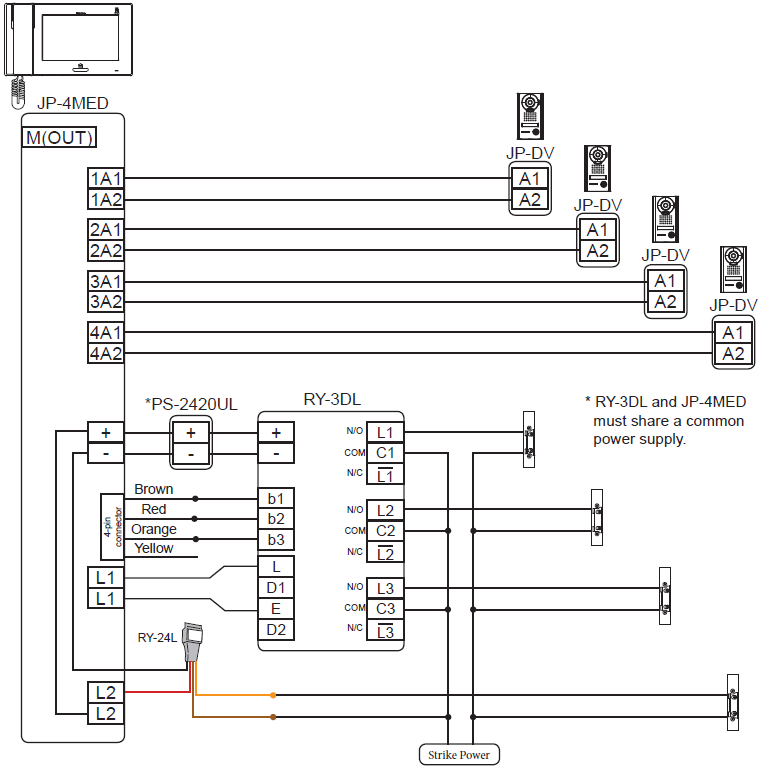
Summary
The JP-4MED can release up to 4 doors when using one RY-3DL and one RY-24L. The first 3 doors will be triggered by the RY-3DL using door release output 1. The 4th door will be triggered by the RY-24L using door release output 2.
Wiring Diagram
Settings on Master
The door release buttons on the JP-4MED master will need to be programmed so that release button 1 will be selectable while doors 1, 2, and 3 are active and release button 2 will be selectable while door 4 is active. Enter the Install Menu. Press and hold the
Home button and then tap
SETTINGS, then
INSTALL. A warning message will show on the screen. Tap
ENTER to enter the install menu.
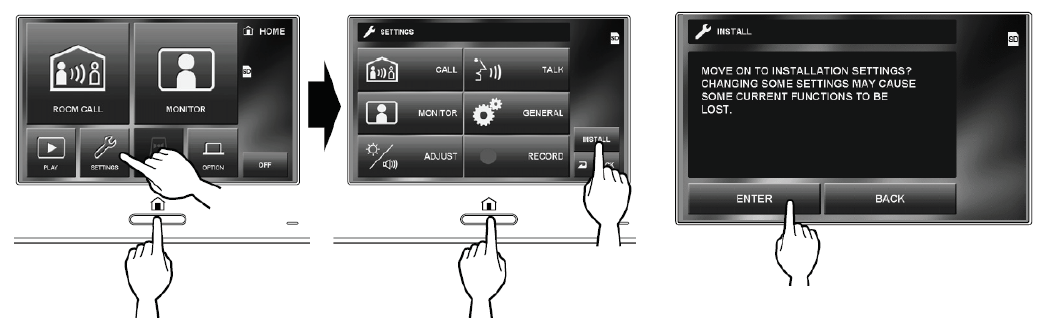
[mkb-tip]Make sure you continue to hold the Home button during this process or you will be returned to the starting screen.[/mkb-tip]
From the Install Menu, tap
SET DOOR RELEASE. Tap
LOCK1 to change the settings for relay 1.
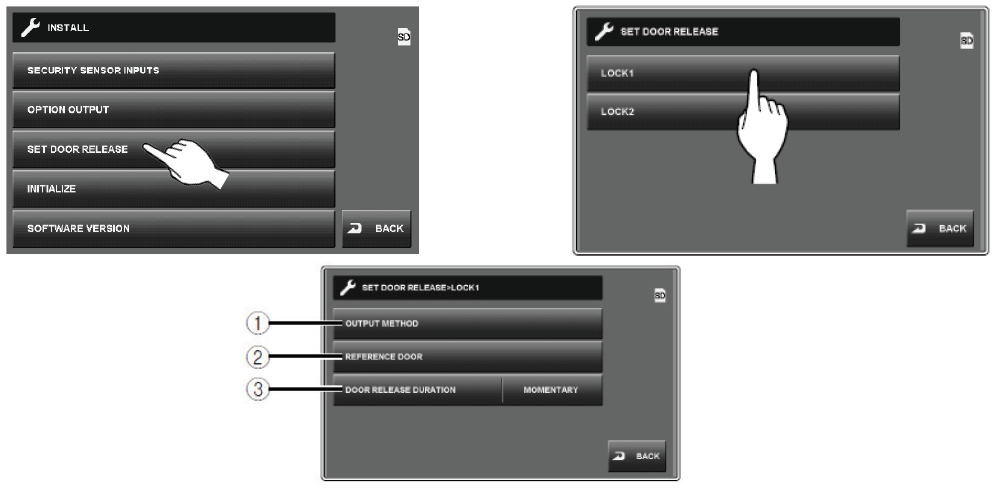
- Tap OUTPUT METHOD and select if relay 1 will be a N/O or N/C contact.
Set to N/O when using the RY-3DL.T
- Tap REFERENCE DOOR and choose to “Show” or “Hide” the door release 1 icon for each door station.
For the drawing on page 1, the door release 1 icon should be shown for doors 1, 2, and 3 and hidden for door 4.
- Tap DOOR RELEASE DURATION to set the door release time for contact L1. The default “momentary” setting will be used when connecting to the RY-3DL.
When done, tap the
BACK button to return to the
SET DOOR RELEASE page. Repeat the process for
LOCK2. When referencing doors, hide doors 1, 2, and 3 and show door 4 for door release icon 2.
[post_title] => Wiring: JP Series with the RY-3DL
[post_excerpt] =>
[post_status] => publish
[comment_status] => open
[ping_status] => open
[post_password] =>
[post_name] => wiring-jp-series-with-the-ry-3dl
[to_ping] =>
[pinged] =>
[post_modified] => 2025-03-13 10:26:22
[post_modified_gmt] => 2025-03-13 17:26:22
[post_content_filtered] =>
[post_parent] => 0
[guid] => https://aiphone.local/kb/wiring-jp-series-with-the-ry-3dl/
[menu_order] => 0
[post_type] => kb
[post_mime_type] =>
[comment_count] => 0
[filter] => raw
)
[1] => WP_Post Object
(
[ID] => 37665
[post_author] => 18
[post_date] => 2023-04-19 17:32:25
[post_date_gmt] => 2023-04-20 00:32:25
[post_content] =>
[post_title] => External Signaling JO, JK, JF, JP, KB, IE
[post_excerpt] =>
[post_status] => publish
[comment_status] => open
[ping_status] => open
[post_password] =>
[post_name] => external-signaling-jo-jk-jf-jp-kb-ie
[to_ping] =>
[pinged] =>
[post_modified] => 2025-03-13 10:25:30
[post_modified_gmt] => 2025-03-13 17:25:30
[post_content_filtered] =>
[post_parent] => 0
[guid] => https://aiphone.local/kb/external-signaling-jo-jk-jf-jp-kb-ie/
[menu_order] => 0
[post_type] => kb
[post_mime_type] =>
[comment_count] => 0
[filter] => raw
)
)
[post_count] => 2
[current_post] => -1
[before_loop] => 1
[in_the_loop] =>
[post] => WP_Post Object
(
[ID] => 37131
[post_author] => 18
[post_date] => 2021-08-15 19:50:20
[post_date_gmt] => 2021-08-16 02:50:20
[post_content] =>
Summary
The JP-4MED can release up to 4 doors when using one RY-3DL and one RY-24L. The first 3 doors will be triggered by the RY-3DL using door release output 1. The 4th door will be triggered by the RY-24L using door release output 2.
Wiring Diagram
Settings on Master
The door release buttons on the JP-4MED master will need to be programmed so that release button 1 will be selectable while doors 1, 2, and 3 are active and release button 2 will be selectable while door 4 is active. Enter the Install Menu. Press and hold the
Home button and then tap
SETTINGS, then
INSTALL. A warning message will show on the screen. Tap
ENTER to enter the install menu.
[mkb-tip]Make sure you continue to hold the Home button during this process or you will be returned to the starting screen.[/mkb-tip]
From the Install Menu, tap
SET DOOR RELEASE. Tap
LOCK1 to change the settings for relay 1.
- Tap OUTPUT METHOD and select if relay 1 will be a N/O or N/C contact.
Set to N/O when using the RY-3DL.T
- Tap REFERENCE DOOR and choose to “Show” or “Hide” the door release 1 icon for each door station.
For the drawing on page 1, the door release 1 icon should be shown for doors 1, 2, and 3 and hidden for door 4.
- Tap DOOR RELEASE DURATION to set the door release time for contact L1. The default “momentary” setting will be used when connecting to the RY-3DL.
When done, tap the
BACK button to return to the
SET DOOR RELEASE page. Repeat the process for
LOCK2. When referencing doors, hide doors 1, 2, and 3 and show door 4 for door release icon 2.
[post_title] => Wiring: JP Series with the RY-3DL
[post_excerpt] =>
[post_status] => publish
[comment_status] => open
[ping_status] => open
[post_password] =>
[post_name] => wiring-jp-series-with-the-ry-3dl
[to_ping] =>
[pinged] =>
[post_modified] => 2025-03-13 10:26:22
[post_modified_gmt] => 2025-03-13 17:26:22
[post_content_filtered] =>
[post_parent] => 0
[guid] => https://aiphone.local/kb/wiring-jp-series-with-the-ry-3dl/
[menu_order] => 0
[post_type] => kb
[post_mime_type] =>
[comment_count] => 0
[filter] => raw
)
[comment_count] => 0
[current_comment] => -1
[found_posts] => 2
[max_num_pages] => 1
[max_num_comment_pages] => 0
[is_single] =>
[is_preview] =>
[is_page] =>
[is_archive] => 1
[is_date] =>
[is_year] =>
[is_month] =>
[is_day] =>
[is_time] =>
[is_author] =>
[is_category] =>
[is_tag] =>
[is_tax] => 1
[is_search] =>
[is_feed] =>
[is_comment_feed] =>
[is_trackback] =>
[is_home] =>
[is_privacy_policy] =>
[is_404] =>
[is_embed] =>
[is_paged] =>
[is_admin] =>
[is_attachment] =>
[is_singular] =>
[is_robots] =>
[is_favicon] =>
[is_posts_page] =>
[is_post_type_archive] => 1
[query_vars_hash:WP_Query:private] => e44f9304e2c64d405e26208787750bf3
[query_vars_changed:WP_Query:private] => 1
[thumbnails_cached] =>
[allow_query_attachment_by_filename:protected] =>
[stopwords:WP_Query:private] =>
[compat_fields:WP_Query:private] => Array
(
[0] => query_vars_hash
[1] => query_vars_changed
)
[compat_methods:WP_Query:private] => Array
(
[0] => init_query_flags
[1] => parse_tax_query
)
)