NWP_Query Object
(
[query] => Array
(
[post_type] => kb
[post__not_in] => Array
(
[0] => 36721
)
[tax_query] => Array
(
[0] => Array
(
[taxonomy] => kbtopic
[field] => slug
[terms] => programming-is-series
)
)
[posts_per_page] => 4
[orderby] => rand
)
[query_vars] => Array
(
[post_type] => kb
[post__not_in] => Array
(
[0] => 36721
)
[tax_query] => Array
(
[0] => Array
(
[taxonomy] => kbtopic
[field] => slug
[terms] => programming-is-series
)
)
[posts_per_page] => 4
[orderby] => meta_value_num menu_order
[error] =>
[m] =>
[p] => 0
[post_parent] =>
[subpost] =>
[subpost_id] =>
[attachment] =>
[attachment_id] => 0
[name] =>
[pagename] =>
[page_id] => 0
[second] =>
[minute] =>
[hour] =>
[day] => 0
[monthnum] => 0
[year] => 0
[w] => 0
[category_name] =>
[tag] =>
[cat] =>
[tag_id] =>
[author] =>
[author_name] =>
[feed] =>
[tb] =>
[paged] => 0
[meta_key] =>
[meta_value] =>
[preview] =>
[s] =>
[sentence] =>
[title] =>
[fields] =>
[menu_order] =>
[embed] =>
[category__in] => Array
(
)
[category__not_in] => Array
(
)
[category__and] => Array
(
)
[post__in] => Array
(
)
[post_name__in] => Array
(
)
[tag__in] => Array
(
)
[tag__not_in] => Array
(
)
[tag__and] => Array
(
)
[tag_slug__in] => Array
(
)
[tag_slug__and] => Array
(
)
[post_parent__in] => Array
(
)
[post_parent__not_in] => Array
(
)
[author__in] => Array
(
)
[author__not_in] => Array
(
)
[search_columns] => Array
(
)
[meta_query] => Array
(
[relation] => OR
[0] => Array
(
[key] => mkb_tax_order_5727
[compare] => EXISTS
)
[1] => Array
(
[key] => mkb_tax_order_5727
[compare] => NOT EXISTS
)
)
[order] => ASC
[ignore_sticky_posts] =>
[suppress_filters] =>
[cache_results] => 1
[update_post_term_cache] => 1
[update_menu_item_cache] =>
[lazy_load_term_meta] => 1
[update_post_meta_cache] => 1
[nopaging] =>
[comments_per_page] => 50
[no_found_rows] =>
[taxonomy] => kbtopic
[term] => programming-is-series
)
[tax_query] => WP_Tax_Query Object
(
[queries] => Array
(
[0] => Array
(
[taxonomy] => kbtopic
[terms] => Array
(
[0] => programming-is-series
)
[field] => slug
[operator] => IN
[include_children] => 1
)
)
[relation] => AND
[table_aliases:protected] => Array
(
[0] => wp_term_relationships
)
[queried_terms] => Array
(
[kbtopic] => Array
(
[terms] => Array
(
[0] => programming-is-series
)
[field] => slug
)
)
[primary_table] => wp_posts
[primary_id_column] => ID
)
[meta_query] => WP_Meta_Query Object
(
[queries] => Array
(
[0] => Array
(
[key] => mkb_tax_order_5727
[compare] => EXISTS
)
[1] => Array
(
[key] => mkb_tax_order_5727
[compare] => NOT EXISTS
)
[relation] => OR
)
[relation] => OR
[meta_table] => wp_postmeta
[meta_id_column] => post_id
[primary_table] => wp_posts
[primary_id_column] => ID
[table_aliases:protected] => Array
(
[0] => wp_postmeta
[1] => mt1
)
[clauses:protected] => Array
(
[wp_postmeta] => Array
(
[key] => mkb_tax_order_5727
[compare] => EXISTS
[compare_key] => =
[alias] => wp_postmeta
[cast] => CHAR
)
[mt1] => Array
(
[key] => mkb_tax_order_5727
[compare] => NOT EXISTS
[compare_key] => =
[alias] => mt1
[cast] => CHAR
)
)
[has_or_relation:protected] => 1
)
[date_query] =>
[queried_object] => WP_Term Object
(
[term_id] => 5727
[name] => Programming
[slug] => programming-is-series
[term_group] => 0
[term_taxonomy_id] => 5727
[taxonomy] => kbtopic
[description] =>
[parent] => 5725
[count] => 7
[filter] => raw
[term_order] => 2
)
[queried_object_id] => 5727
[request] => SELECT SQL_CALC_FOUND_ROWS wp_posts.ID
FROM wp_posts LEFT JOIN wp_term_relationships ON (wp_posts.ID = wp_term_relationships.object_id) LEFT JOIN wp_postmeta ON ( wp_posts.ID = wp_postmeta.post_id ) LEFT JOIN wp_postmeta AS mt1 ON ( wp_posts.ID = mt1.post_id AND mt1.meta_key = 'mkb_tax_order_5727' )
WHERE 1=1 AND wp_posts.ID NOT IN (36721) AND (
wp_term_relationships.term_taxonomy_id IN (5727)
) AND (
wp_postmeta.meta_key = 'mkb_tax_order_5727'
OR
mt1.post_id IS NULL
) AND ((wp_posts.post_type = 'kb' AND (wp_posts.post_status = 'publish' OR wp_posts.post_status = 'acf-disabled')))
GROUP BY wp_posts.ID
ORDER BY wp_postmeta.meta_value+0 ASC, wp_posts.menu_order ASC
LIMIT 0, 4
[posts] => Array
(
[0] => WP_Post Object
(
[ID] => 36715
[post_author] => 23
[post_date] => 2021-05-05 13:43:57
[post_date_gmt] => 2021-05-05 20:43:57
[post_content] =>
Summary
Steps to reset the IS-CCU to factory default settings.
Solution
The cover of the IS-CCU will need to be removed to access dip switches on a specific PCB.
Step 1
Disconnect power from the IS-CCU and remove its cover. The cover is fastened by two screws on both sides of the control unit that will need to be removed.
Step 2
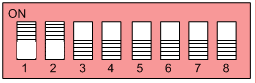
On the XC1304A board located near the Ethernet port, set bit #1 and #1 of SW1 to ON.

Step 3
Connect the PC used to program the system to the IS-CCU and connect power.
Step 4
Set the IP Address of the programming PC to something in the default range of 192.168.0.xxx / 255.255.255.0 and login to the IS-CCU using a web browser and navigate to "https://192.168.0.30". The system username and password are both "aiphone".
Step 5
Within the web interface, under the "Maintenance" menu option found on the left side of the screen, select "Initialization". Selecting this option will return the IS-CCU to its original factory settings.
[mkb-warning]Make sure to set the dip switches back to "Off" before replacing the cover of the IS-CCU[/mkb-warning]
[post_title] => How to factory default an IS-CCU
[post_excerpt] =>
[post_status] => publish
[comment_status] => open
[ping_status] => open
[post_password] =>
[post_name] => how-to-factory-default-an-is-ccu
[to_ping] =>
[pinged] =>
[post_modified] => 2025-03-12 08:39:50
[post_modified_gmt] => 2025-03-12 15:39:50
[post_content_filtered] =>
[post_parent] => 0
[guid] => https://aiphone.local/kb/how-to-factory-default-an-is-ccu/
[menu_order] => 0
[post_type] => kb
[post_mime_type] =>
[comment_count] => 0
[filter] => raw
)
[1] => WP_Post Object
(
[ID] => 36727
[post_author] => 23
[post_date] => 2021-05-05 13:38:32
[post_date_gmt] => 2021-05-05 20:38:32
[post_content] =>
Summary
Steps on how to download the System Log for troubleshooting purposes.
Solution
To download the system log data, do the following:
- Access the IS-CCU or Host/Client unit via web browser.
- Click System Log in the table of contents on the left side of the window.
- Click Download to open the log data. The log data will open in a txt file format.
- Save that file to your PC using a memorable file name.
[post_title] => Downloading IS Series System Log Files
[post_excerpt] =>
[post_status] => publish
[comment_status] => open
[ping_status] => open
[post_password] =>
[post_name] => downloading-is-series-system-log-files
[to_ping] =>
[pinged] =>
[post_modified] => 2021-05-05 13:38:32
[post_modified_gmt] => 2021-05-05 20:38:32
[post_content_filtered] =>
[post_parent] => 0
[guid] => https://aiphone.local/kb/downloading-is-series-system-log-files/
[menu_order] => 0
[post_type] => kb
[post_mime_type] =>
[comment_count] => 0
[filter] => raw
)
[2] => WP_Post Object
(
[ID] => 36728
[post_author] => 23
[post_date] => 2021-05-05 13:37:49
[post_date_gmt] => 2021-05-05 20:37:49
[post_content] =>
Summary
Steps to download and upload setting files from an IS-IP station.
Solution
Downloading a Setting File
- Open a web browser and enter "https://" followed by the IP address of the device into the address bar.
- Click past the security certificate error, select a language, and login to the device using the admin ID and password.
- From the left hand side menu, click "Downloading the Setting File" and then click the Download button.
- Save the file.
Uploading a Setting File
- Open a web browser and enter "https://" followed by the IP address of the device into the address bar.
- Click past the security certificate error, select a language, and login to the device using the admin ID and password.
- From the left hand side menu, click "Uploading the setting file" and then click the Upload button.
- Click the Browse button and navigate to an existing setting file, click Ok.
- With the browse field filled out with the correct information, click the Upload button.
- A red message "settings are not applied until you click the Update button." will appear at the top of the screen. Do not proceed to Updating the system yet, instead go to "Network Setting: Individual" and confirm that the network settings are correct.
[mkb-info]The configuration file will typically have an IP address assignment outside the range of your network, be sure to change this address to something that makes sense for the network it is connected to (or will be connected to), then click Temporarily stored.[/mkb-info]
[post_title] => Downloading and Uploading Setting Files
[post_excerpt] =>
[post_status] => publish
[comment_status] => open
[ping_status] => open
[post_password] =>
[post_name] => downloading-and-uploading-setting-files
[to_ping] =>
[pinged] =>
[post_modified] => 2021-05-05 13:37:49
[post_modified_gmt] => 2021-05-05 20:37:49
[post_content_filtered] =>
[post_parent] => 0
[guid] => https://aiphone.local/kb/downloading-and-uploading-setting-files/
[menu_order] => 0
[post_type] => kb
[post_mime_type] =>
[comment_count] => 0
[filter] => raw
)
[3] => WP_Post Object
(
[ID] => 36729
[post_author] => 23
[post_date] => 2021-05-05 14:12:59
[post_date_gmt] => 2021-05-05 21:12:59
[post_content] =>
Summary
IS-IP Series global system configuration rules.
Why do I need to use a global IS Series system?
You need a global IS Series system when sites are separated by the internet without a VPN, or when the VPN does not support IGMP data.
What if I have 2 or more subnets on a large routed network?
No, do not use a global system configuration, stick to a single site configuration.
What if I have more than 32 IP addresses on my single large network?
If you choose to do multiple sites, you have to be behind NAT forwarding rules. Doing NAT inside a large network is awkward and requires a lot of adjustments to the network. So while it is possible, it is not practical or feasible for most people.
How do I setup Global configurations in the IS System?
Each site will have a host. Each site will register other sites that it needs to call or be called from. Each site will need to be behind a router that will port forward using NAT. Each Site needs to be behind a router/gateway, and each site will need to know both the private side default gateway and the Public IP address provided by the ISP. NAT port forwarding rules will need to be configured on the Router. Please see the IP unit registration page after the site has been completely configured, updated, and restarted using the new settings.
[mkb-info]Aiphone cannot assist with configuring NAT rules on routers, however the last page in this article will show what ports and addresses will need forwarding rules. The list will be customized (and different) for each site.[/mkb-info]
Each site must have a Host and will use the pre-installation IS
network information sheet to gather information about this site that network Administrators will need to know about (or assign to) the IS Series equipment.
Network setting: Individual
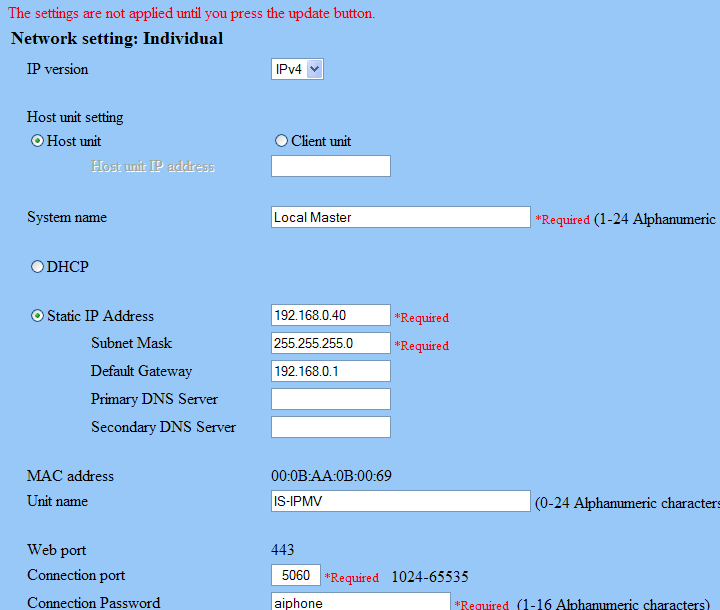
In Network setting: Individual, make sure there is a Default Gateway, and verify the port and password (other sites will need to know this).
Network setting: Common
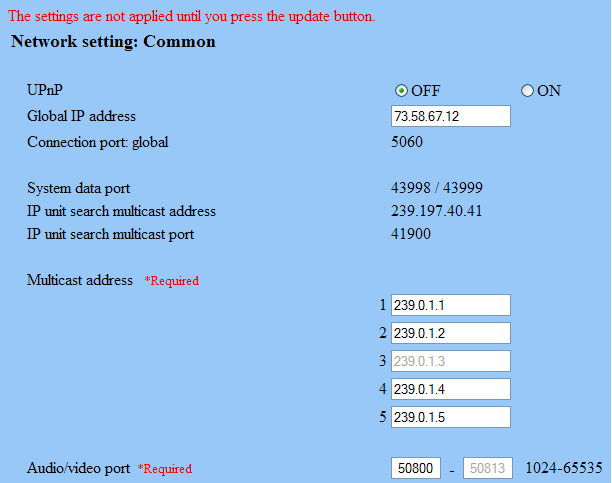
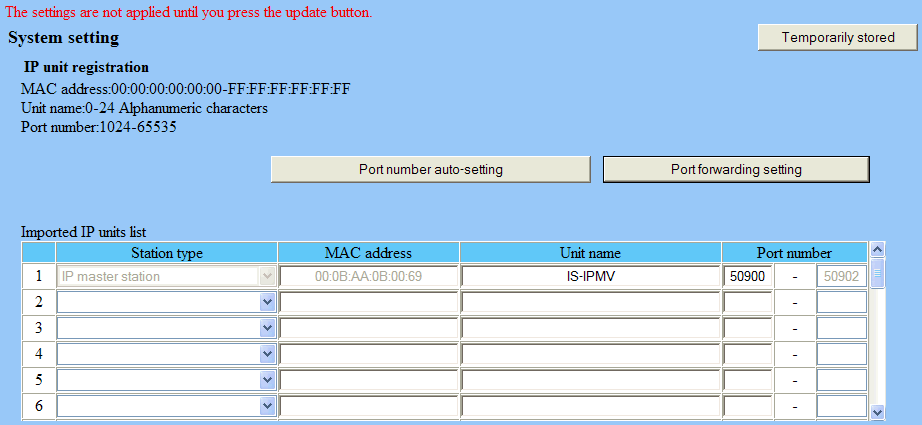
In Network setting: Common, turn off UPnP and set the Gateway's Public IP address. You will need to set NAT rules for this Gateway so that it forwards traffic to this host. Note the Audio/video port range at the bottom. This tells the host what ports to use to listen to other sites. You will set port forwarding rules to this host on the router / gateway based on information found in IP unit registration using the port forwarding setting button.
Area/Site registration
To fill this out, you will need information about the other site's Global IP address, port and password. You have already set this for your site. The other sites will need to have gone through the steps above and then fill out the
Pre-installation IS Network information sheet pdf.
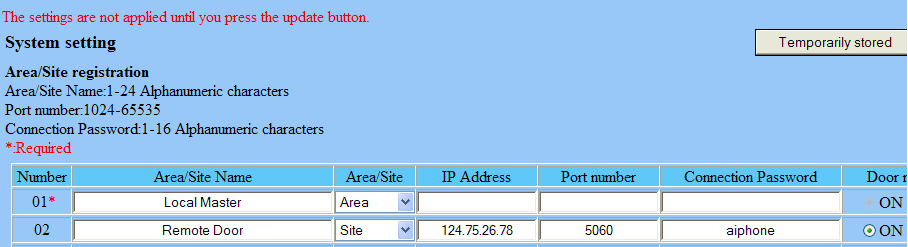
Area 01 is this site. It does not have to match the system name listed on Network setting: Individual, but it helps to keep them consistent.
Area 02 should reference a memorable name for the remote site. Set the drop down to site, and then give the public address, port, and password for the remote site.
IP unit registration: Clients
This example has no Clients attached to this host, but they would be listed here along with port numbers (after you fill it in).
Note the presence of the [Port forwarding setting] button, we will come back to this button as it is one of the last steps you will do in configuring this site.
Registering Stations
With this example system, enter the station number and station name for any stations in this Site, then click Temporarily stored.

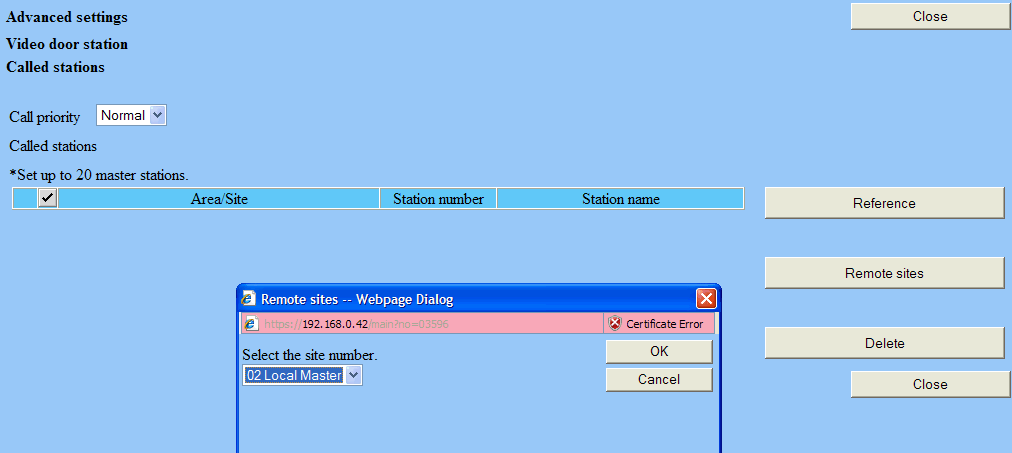
Advanced station settings: Set doors to call other sites
How to set doors to call other sites
Remote door site
Since there aren't any door stations in this site, let's take a brief look at the other site. We need to program doors to call a Remote site.
Go to Advanced station settings and check off the doors you want to program, then click [Advanced settings].

You will see a popup for [Called stations] or [Other]. Click [Called stations] and you will get something like this:
Click Reference for local master stations it should call and click Remote sites for the remote site it should call. Choose the remote site you wish it to call, then click [OK]. Close the popups and click Temporarily stored back in the main window.
Local Master Site
Remote site pilot call setting
Click Remote site pilot call setting to tell which Master stations should receive calls from other Sites.
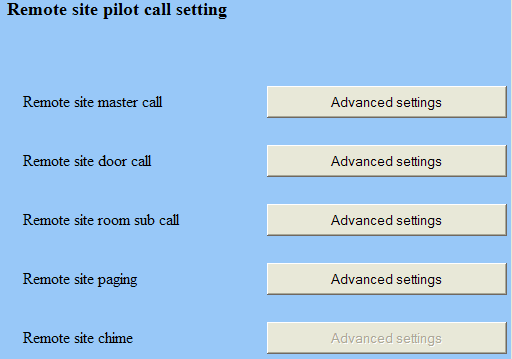
Receiving calls from masters: Click Advanced settings next to "master call" and click Reference. Choose the master station that will receive calls from master stations.

Receiving calls from doors: Click Advanced settings next to "door call" and click Reference. Choose the master station that will receive calls from door stations.

Close the popups and click Temporarily stored in the main window.
Updating the system
When you are done, update the system and login again (if you changed the IP address in Network setting: Individual).
IP unit registration: Port forwarding setting button
Go to IP unit registration and click the button [Port forwarding setting].
This will open a window that will guide you in opening ports for this Site. Print this and send to the Network Administrator that is creating the NAT rules for the Router.

[mkb-tip]See how the router's public address is listed (configured in Network setting: Common)? Also note the port range is 50800-50806, the first half of the range presented at the bottom of Network setting: Common. This example shows the simplest forwarding rules for a site. There may be additional lines for additional equipment, depending on the composition of this Site.[/mkb-tip]
Repeat these steps for each site
It is extremely helpful to have one
Pre-installation IS Network information sheet for each Site.
[post_title] => IS-IP Global System Configuration Rules
[post_excerpt] =>
[post_status] => publish
[comment_status] => open
[ping_status] => open
[post_password] =>
[post_name] => is-ip-global-system-configuration-rules
[to_ping] =>
[pinged] =>
[post_modified] => 2025-03-12 08:39:56
[post_modified_gmt] => 2025-03-12 15:39:56
[post_content_filtered] =>
[post_parent] => 0
[guid] => https://aiphone.local/kb/is-ip-global-system-configuration-rules/
[menu_order] => 0
[post_type] => kb
[post_mime_type] =>
[comment_count] => 0
[filter] => raw
)
)
[post_count] => 4
[current_post] => -1
[before_loop] => 1
[in_the_loop] =>
[post] => WP_Post Object
(
[ID] => 36715
[post_author] => 23
[post_date] => 2021-05-05 13:43:57
[post_date_gmt] => 2021-05-05 20:43:57
[post_content] =>
Summary
Steps to reset the IS-CCU to factory default settings.
Solution
The cover of the IS-CCU will need to be removed to access dip switches on a specific PCB.
Step 1
Disconnect power from the IS-CCU and remove its cover. The cover is fastened by two screws on both sides of the control unit that will need to be removed.
Step 2
On the XC1304A board located near the Ethernet port, set bit #1 and #1 of SW1 to ON.
Step 3
Connect the PC used to program the system to the IS-CCU and connect power.
Step 4
Set the IP Address of the programming PC to something in the default range of 192.168.0.xxx / 255.255.255.0 and login to the IS-CCU using a web browser and navigate to "https://192.168.0.30". The system username and password are both "aiphone".
Step 5
Within the web interface, under the "Maintenance" menu option found on the left side of the screen, select "Initialization". Selecting this option will return the IS-CCU to its original factory settings.
[mkb-warning]Make sure to set the dip switches back to "Off" before replacing the cover of the IS-CCU[/mkb-warning]
[post_title] => How to factory default an IS-CCU
[post_excerpt] =>
[post_status] => publish
[comment_status] => open
[ping_status] => open
[post_password] =>
[post_name] => how-to-factory-default-an-is-ccu
[to_ping] =>
[pinged] =>
[post_modified] => 2025-03-12 08:39:50
[post_modified_gmt] => 2025-03-12 15:39:50
[post_content_filtered] =>
[post_parent] => 0
[guid] => https://aiphone.local/kb/how-to-factory-default-an-is-ccu/
[menu_order] => 0
[post_type] => kb
[post_mime_type] =>
[comment_count] => 0
[filter] => raw
)
[comment_count] => 0
[current_comment] => -1
[found_posts] => 6
[max_num_pages] => 2
[max_num_comment_pages] => 0
[is_single] =>
[is_preview] =>
[is_page] =>
[is_archive] => 1
[is_date] =>
[is_year] =>
[is_month] =>
[is_day] =>
[is_time] =>
[is_author] =>
[is_category] =>
[is_tag] =>
[is_tax] => 1
[is_search] =>
[is_feed] =>
[is_comment_feed] =>
[is_trackback] =>
[is_home] =>
[is_privacy_policy] =>
[is_404] =>
[is_embed] =>
[is_paged] =>
[is_admin] =>
[is_attachment] =>
[is_singular] =>
[is_robots] =>
[is_favicon] =>
[is_posts_page] =>
[is_post_type_archive] => 1
[query_vars_hash:WP_Query:private] => b7ccffff7f693a1a8885750edfc24404
[query_vars_changed:WP_Query:private] => 1
[thumbnails_cached] =>
[allow_query_attachment_by_filename:protected] =>
[stopwords:WP_Query:private] =>
[compat_fields:WP_Query:private] => Array
(
[0] => query_vars_hash
[1] => query_vars_changed
)
[compat_methods:WP_Query:private] => Array
(
[0] => init_query_flags
[1] => parse_tax_query
)
)